‘Tinny Ray Tracer’ introduces the ray tracing under 300 lines code. It was a great fun to follow the instructions and made the renderer. We learn the algorithm layer by layer, with one color at beginning, then with diffusion, reflection and refraction at last.
This article add some extended notes and resources together for a thorough understanding of geometric calculation along with ray tracing.

Preparation
All we need is C++ and a bit theory of ray tracing, no other fancy libraries. We can dive into the core directly without any configuration of OpenGL. In order to keep it simple, we will render the image into a file, instead of using OpenGL to draw in the window.
To make the programming with multi-dimensional vectors easy, we would better to define some templates for vectors.
You can skip this part and just include “geometry.h”. It is not essential, for implementing the main part.
|
Step 1: Draw an image with colors
Let’s simply paint some color first, and output it to a pixmap file. We use PPM. It is a very simple format for pixmap.
The file format looks like this:
P6        // this is the format name
1024 768  // height and width of the image
255       // use 256-color
0 0 0 120 120 0 .... // RGB color number
<<geometry>> |
You should see this result:

Step 2: Draw a sphere
Here comes the main part: Ray Tracing.
It works by tracing a path from an imaginary eye through each pixel in a virtual screen, and calculating the color of the object visible through it.
Each ray must be tested for intersection with some object in the scene. Once the nearest object has been identified, the algorithm will estimate the incoming light at the point of intersect and calculate the final color of that pixel.
If the ray encounters a reflective or translucent materials, it requires more rays to re-cast(recursion problem) from that point into the scene.
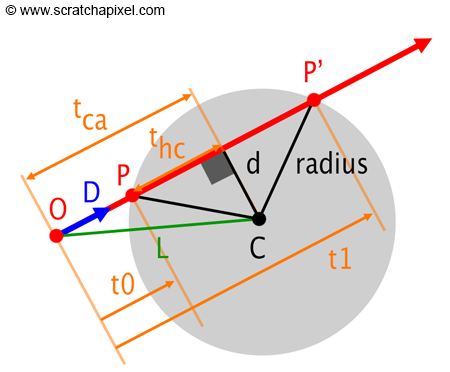
We need a sphere. To represent a sphere, we only need a 3-dim vector to mark its center, and a scalar to determine its radius.
We also need a function to check the intersection.
struct Sphere { |
To check if a ray intersect a sphere, we draw a line through center, perpendicular to the ray.
The length of of this line is d. We only have to check if d larger or smaller then the radius.

There are three types of intersection with the ray:
- light source is before the sphere
- light source is in the sphere
- light source is behind the sphere
